
Version Control: Staying Gucci
Version Control Systems
What is a Version Control System
Version Control Systems are systems that record changes to a file or set of file over time. What may they be used for?
- Recalling specific versions
- Reverting to specific versions
- Documenting changes to file over time
Categorization of Version Control Systems
Classifications include:
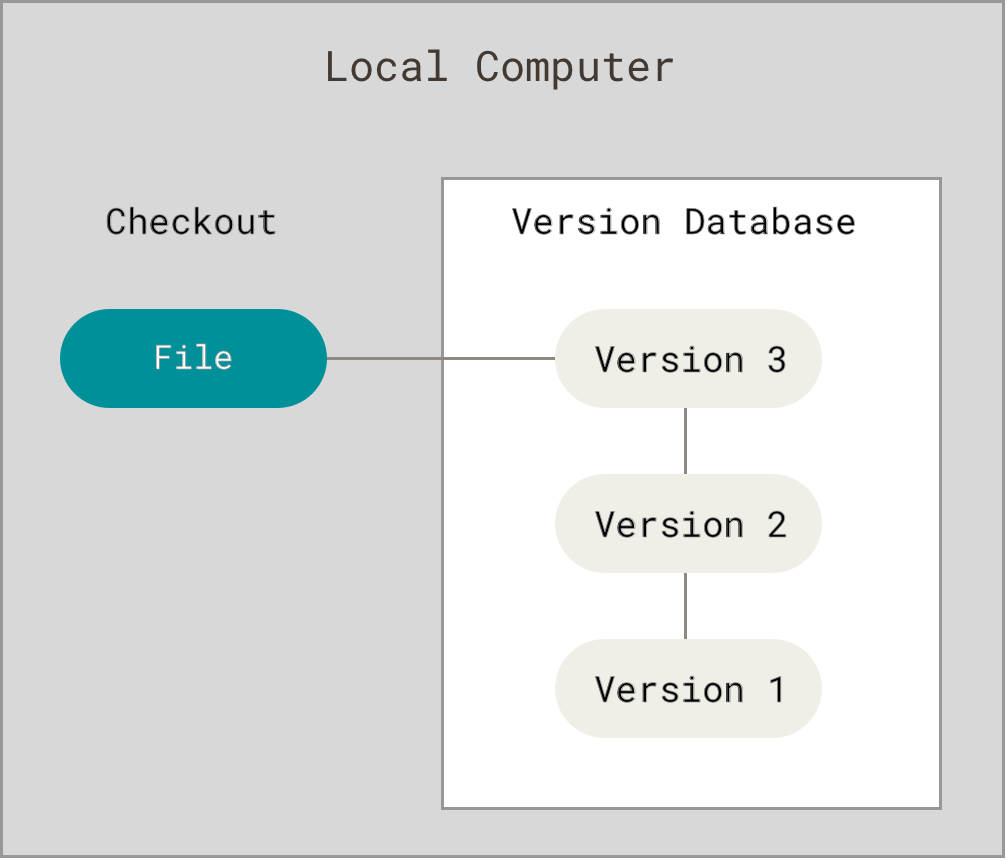
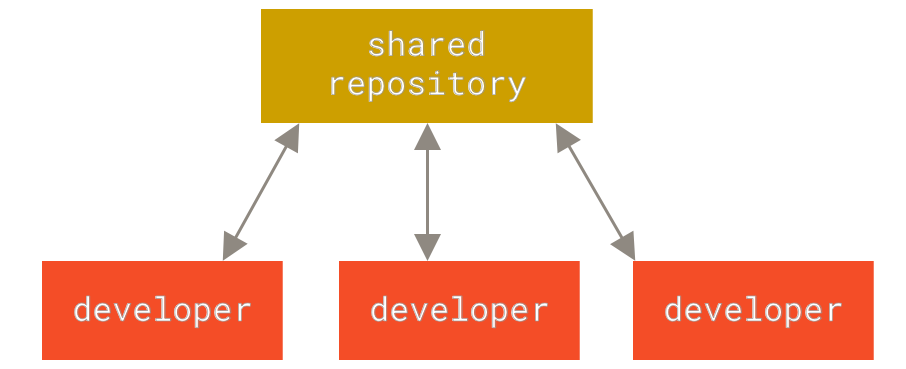
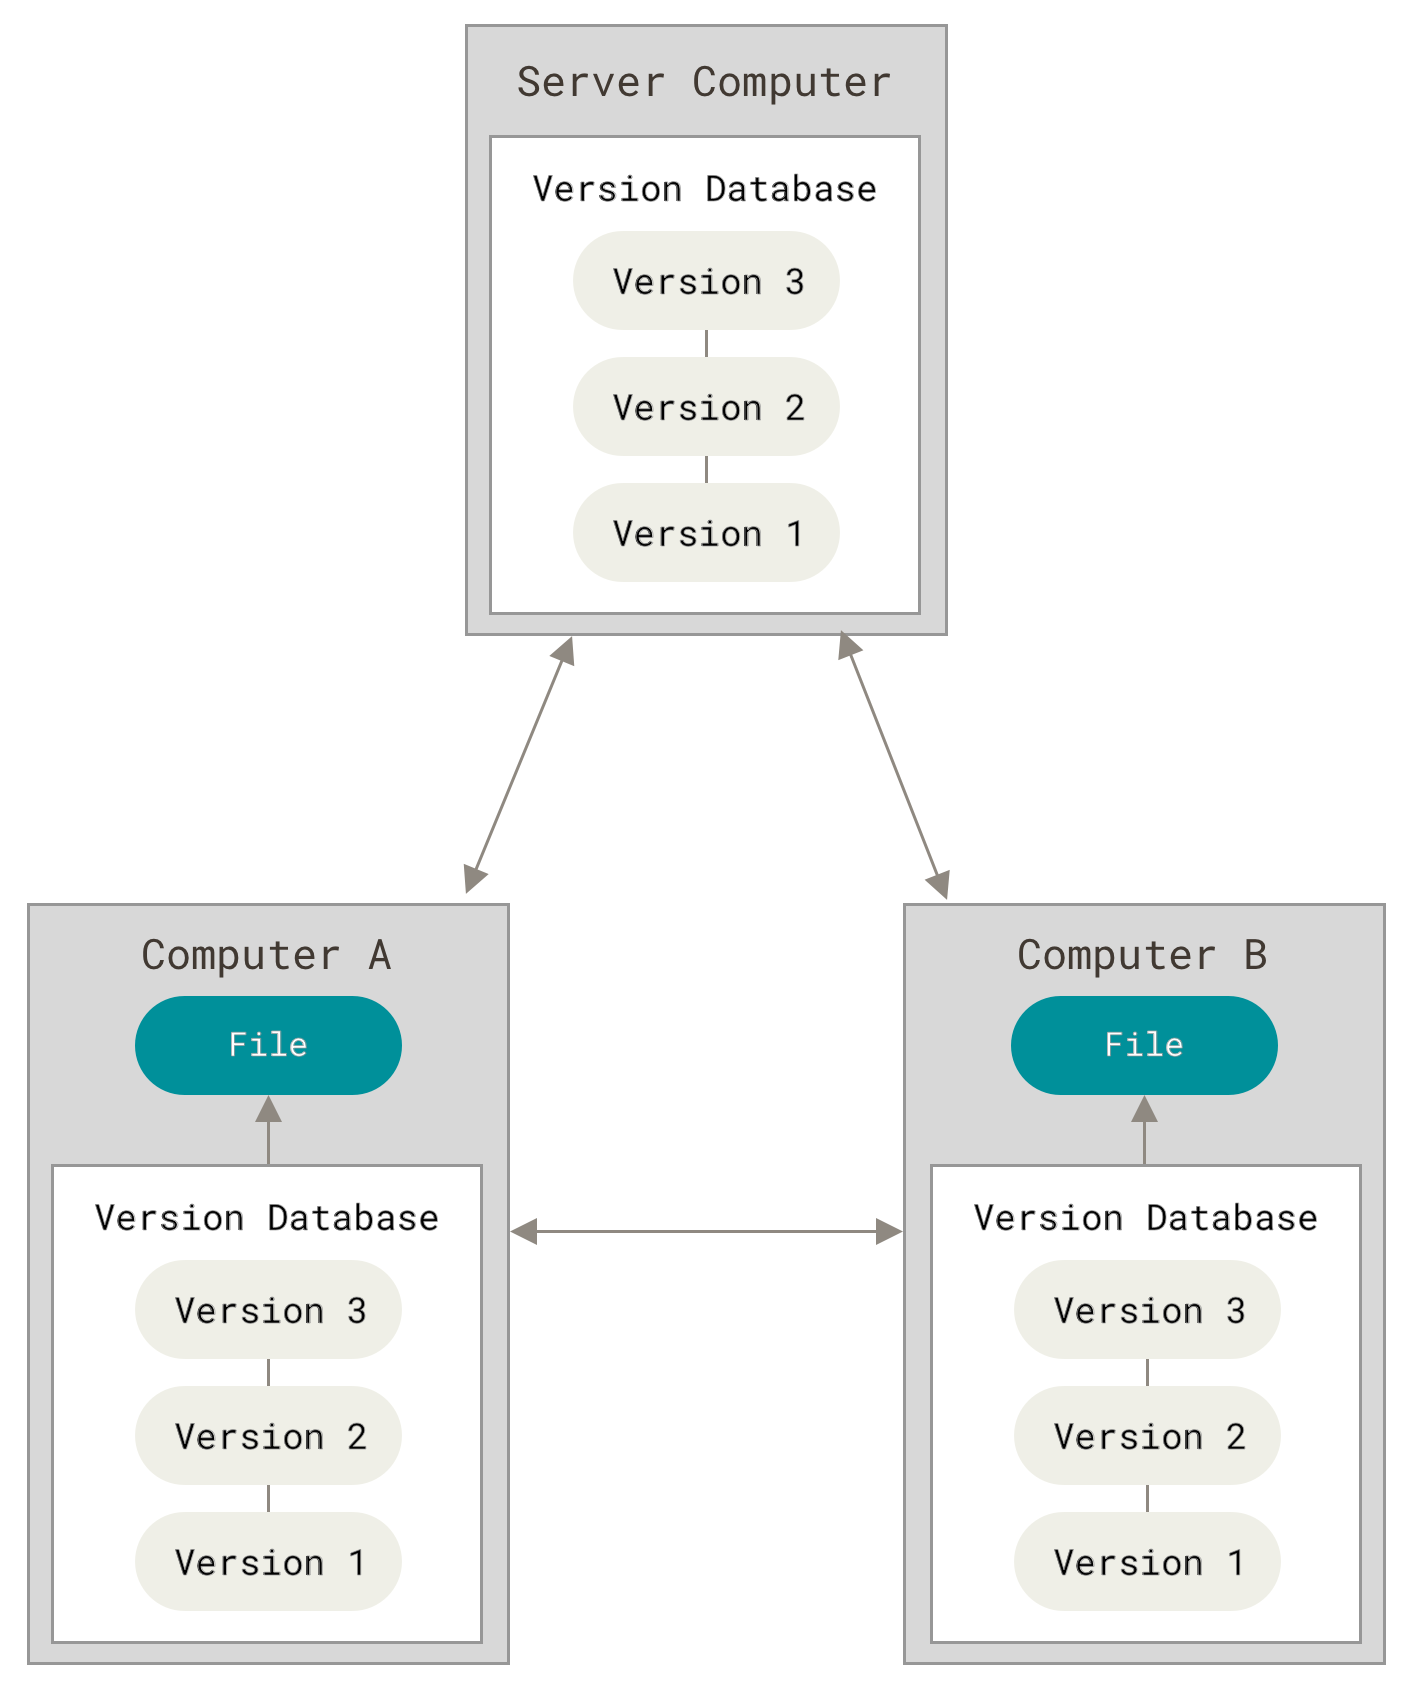
| Local VCS | Centralized VSC | Distributed VCS |
|---|---|---|
 |
 |
 |
Examples of Version Control Systems
Centralized
- Apache Subversion (SVN) (C)
- Darks (D)
- Perforce (C)
- Git
- Mercurial Source Control Management (D)
- GNU Bazaar (D)
- CVS (Concurrent Versions System) (C)
(L = Local, C = Centralized, D = Distributed)
Notice that none are local.
The bottom line
Each have their own little benefits but the main ones are Subversion and Git. Git has massively raised in popularity over time but a lot of professional environments are still using Subversion. As time passes, Git will become more and more popular because it’s very easy and reliable. By 2020, SVN will be pretty much obsolete.
Git Basics
What is git?
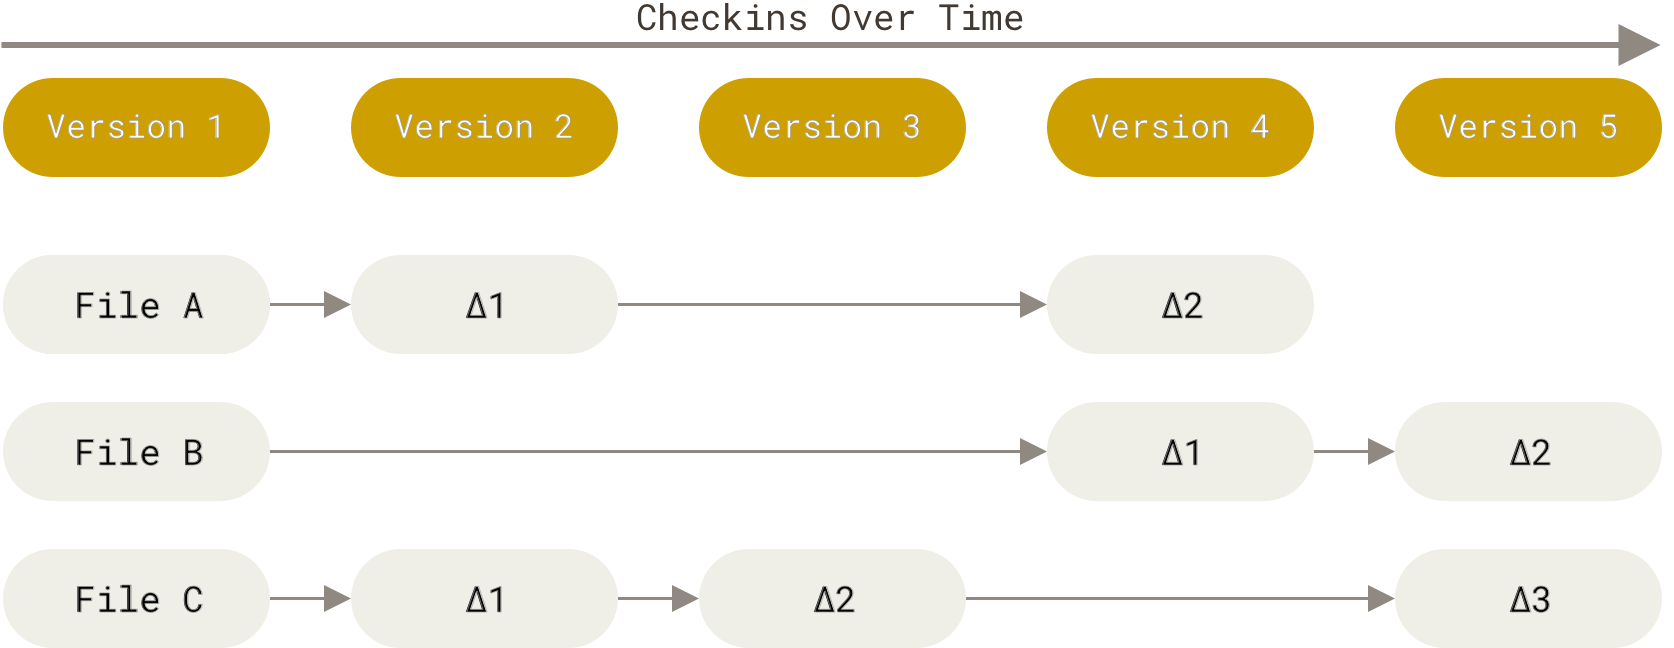
Git is a snapshot based VCS. This means that instead of recording changes in a file (delta-based VC), it records a series of snapshots in a miniature file system.
Most of Git is done locally (so it’s pretty fast, as we said earlier). Using this system means git mostly adds data, which means it’s very easy to revert or look back. There are plenty of graphical interfaces that help you use GitHub, but here, we’ll be teaching command line git since it’s universal.
Files and their three states
Git works with all files. Yes, you can use it to record changes in code (it’s main purpose, ofc), but it is mostly indifferent to the type of file. Within a repository, files may be in three distinct states:
- Committed: Data is safely stored in your repository
- Modified: Data has been changed, but may not necessarily be in your repository yet
- Staged: Git has selectively marked this file for your next commit

Installation
Right now, we CBA with showing you how to install GitHub, so there is a link that will help you out in references. It’s very easy. We recommend all the programs that the guy is installing, as they make your life very easy. This will be slightly different for Mac & Windows users.
Making a repository
To obtain a git repository, you may either clone an existing one, or turn a current directory into a git repository.
Creating a repository:
-
Go to your directory:
$ cd /c/user/my_project -
Initialize your repository:
$ git init -
Commit your current file system:
$ git add *.c

$ git add LICENSE

$ git commit -m 'initial project version
Cloning a repository:
git clone <url> [name]
File lifecycle
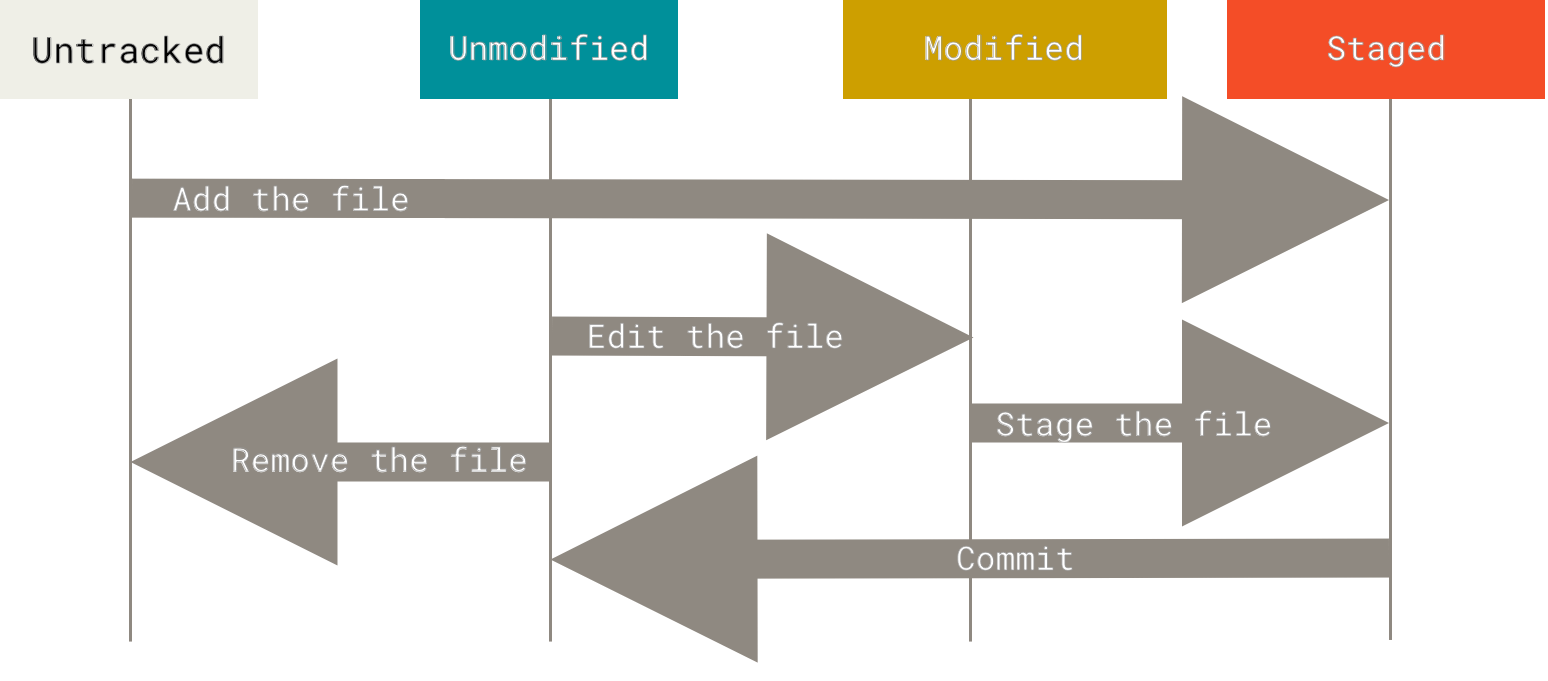
Checking status and staging
To check the status of your directory in terms of the repository, use: $ git status. There are a few possible responses:
On branch master
Your branch is up-to-date with 'origin/master'.
nothing to commit, working directory clean
OR:
$ git status
On branch master
Your branch is up-to-date with 'origin/master'.
Untracked files:
  (use "git add <file>..." to include in what will be committed)
    README
nothing added to commit but untracked files present (use "git add" to track)
OR:
$ git status
On branch master
Your branch is up-to-date with 'origin/master'.
Changes to be committed:
  (use "git reset HEAD <file>..." to unstage)
    new file:   README
Changes not staged for commit:
  (use "git add <file>..." to update what will be committed)
  (use "git checkout -- <file>..." to discard changes in working directory)
    modified:   CONTRIBUTING.md
Here, you can see GitHub has told us of two distinct commands that can modify the staging area. Note: When you change a file, the “Snapshot” that is staged will not modify, this can lead to tricky scenarios like:
$ git status
On branch master
Your branch is up-to-date with 'origin/master'.
Changes to be committed:
  (use "git reset HEAD <file>..." to unstage)
    new file:   README
    modified:   CONTRIBUTING.md
Changes not staged for commit:
  (use "git add <file>..." to update what will be committed)
  (use "git checkout -- <file>..." to discard changes in working directory)
    modified:   CONTRIBUTING.md
If you want to feel fancy and smart, try $ git status -s. This will shorten status text.
Checking differences in files
Checking differences between your current branch and staged files is really easy. Try $ git diff. Or $ git diff --staged. Example output is:
$ git diff --staged
diff --git a/README b/README
new file mode 100644
index 0000000..03902a1
--- /dev/null
+++ b/README
@@ -0,0 +1 @@
+My Project
Committing your changes
To commit changes, simply use the $ git commit -m <title of commit> command:
$ git commit -m "Story 182: Fix benchmarks for speed"
[master 463dc4f] Story 182: Fix benchmarks for speed
 2 files changed, 2 insertions(+)
 create mode 100644 README
Removing files
To remove a file from git, you have to remove it from your staged area and tracked files; it will be no longer included in the “snapshots”. The command for this is $ git rm <file>. If you simply remove the file, it will remain in your commit (the change will be unstaged). Notice how git is making it very hard to lose data (why it’s so awesome). Moving files can be done through $ git mv <file_from> <file_to>.
Unmodifying files
Even though this isn’t a word, it’s still quite useful. Unstaging is self explanatory. Unmodifying may be necessary if you realize you don’t want to keep the changes you’ve made. Both of these are laid out in the status prompt above.
Branches
The master branch
New features shouldn’t first be tried on the master branch — if you’ve made a mistake, it could affect everyone using your code. Thanks to branches, you can create a test environment so your team can check your work.
The back-end — a reminder
Other version-control systems discourage branching because they copy over the entire code. GitHub only stores what they call “snapshots” and pointers back to old commits, basically removing the need for your code to be copied again and again.
Making a new branch
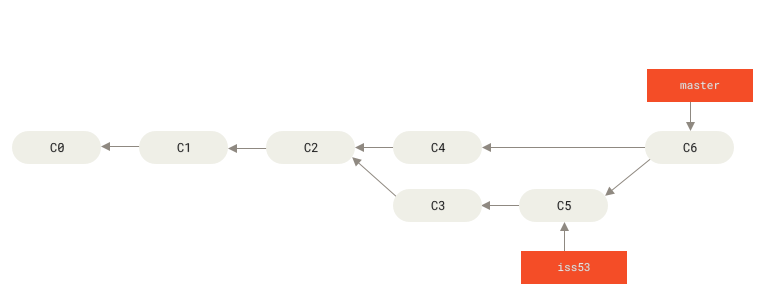
$ git branch iss53 will create a pointer to your last commit; the new branch will start here. It doesn’t automatically switch to that branch, so be careful. To switch branches, run: $ git checkout iss53. Running $ git rev-parse --abbrev-ref HEAD -- will show the current branch. Switching back to the master branch will bring all the files back to the C2 commit, both online and in your working directory, though the C3 branch won’t be deleted.
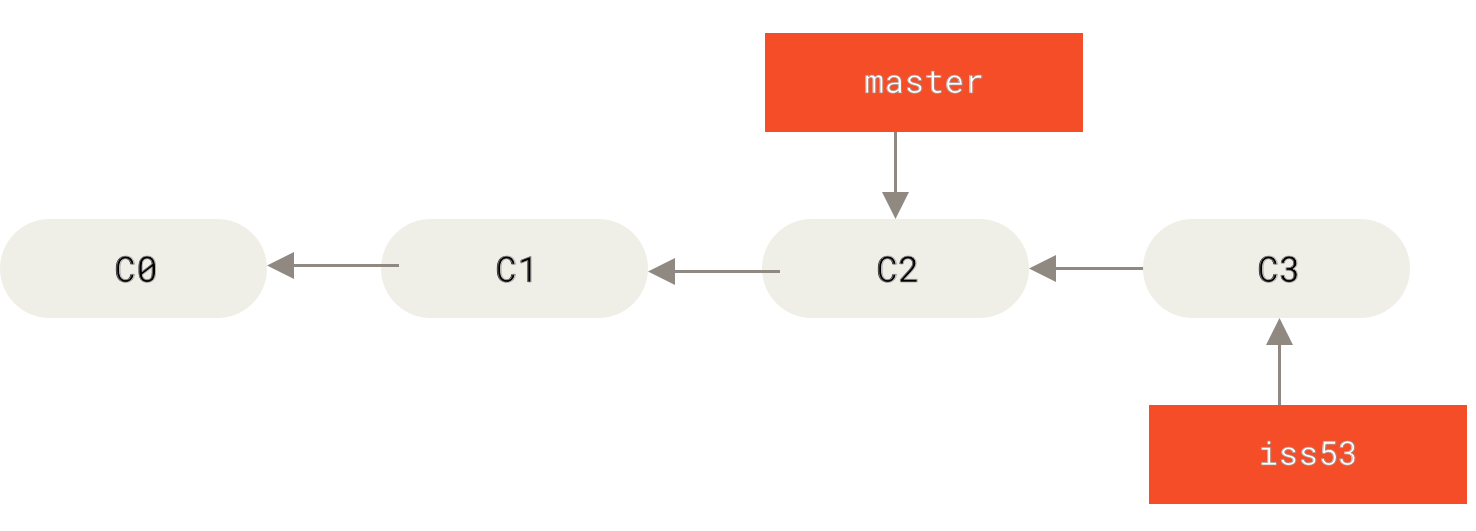
In the image, the “iss53” branch (short for a hypothetical issue #53) has one more commit than the “master” branch.
Divergent branches
After leaving your iss53 branch to make a few changes to the master branch, your commit history may look like this:
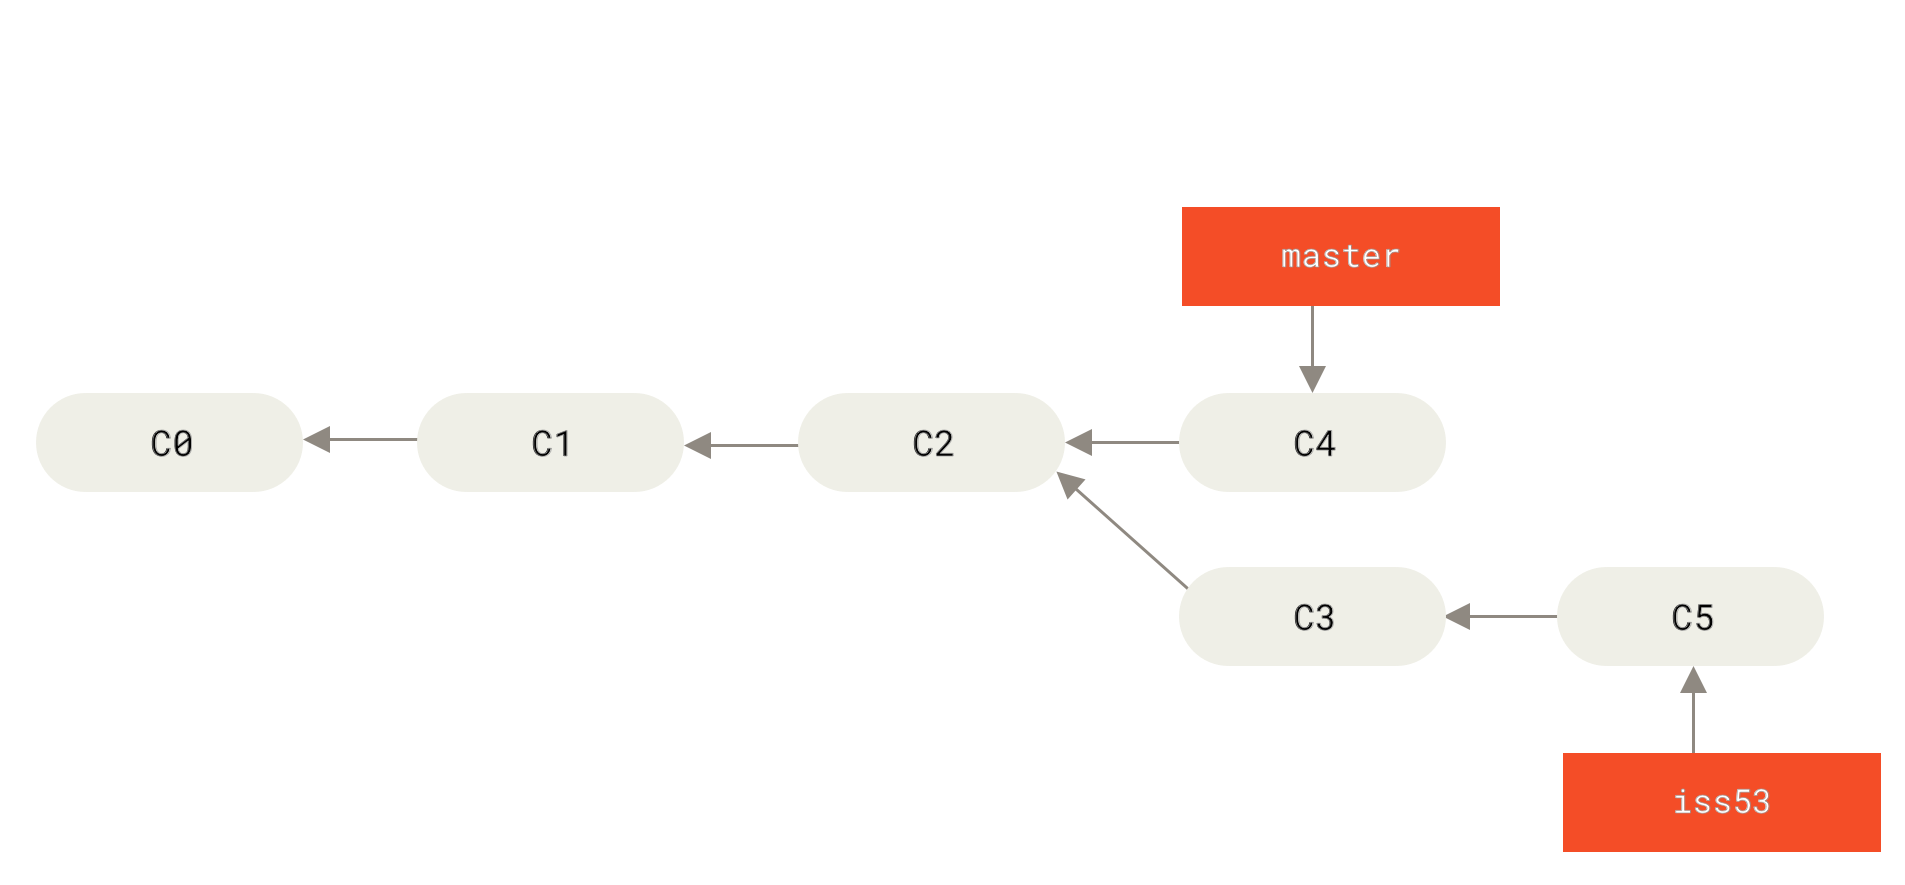
Your team was too impatient to wait for you to resolve issue #53, so they went ahead and made commit #4. It’s important to realize that C4 is based on the same version of code from which you began work on issue #53, so none of the new changes from C3 and C5 affect C4. GitHub — but not many other version-control systems — encourages divergent branches, because they can always be merged later.
Merging branches
Most branches are made with the end goal of bringing them into the master branch, for which merging is the necessary tool. Merging is simple: $ git checkout master, followed by a $ git merge iss53. This will merge C5 into C4, using C2 as the common ancestor to which the new commit snapshots point. If there are conflicts in C4 and C5, git will use C2 to figure out which one actually has changes. If both have changes from the original document, this will require a manual resolution.
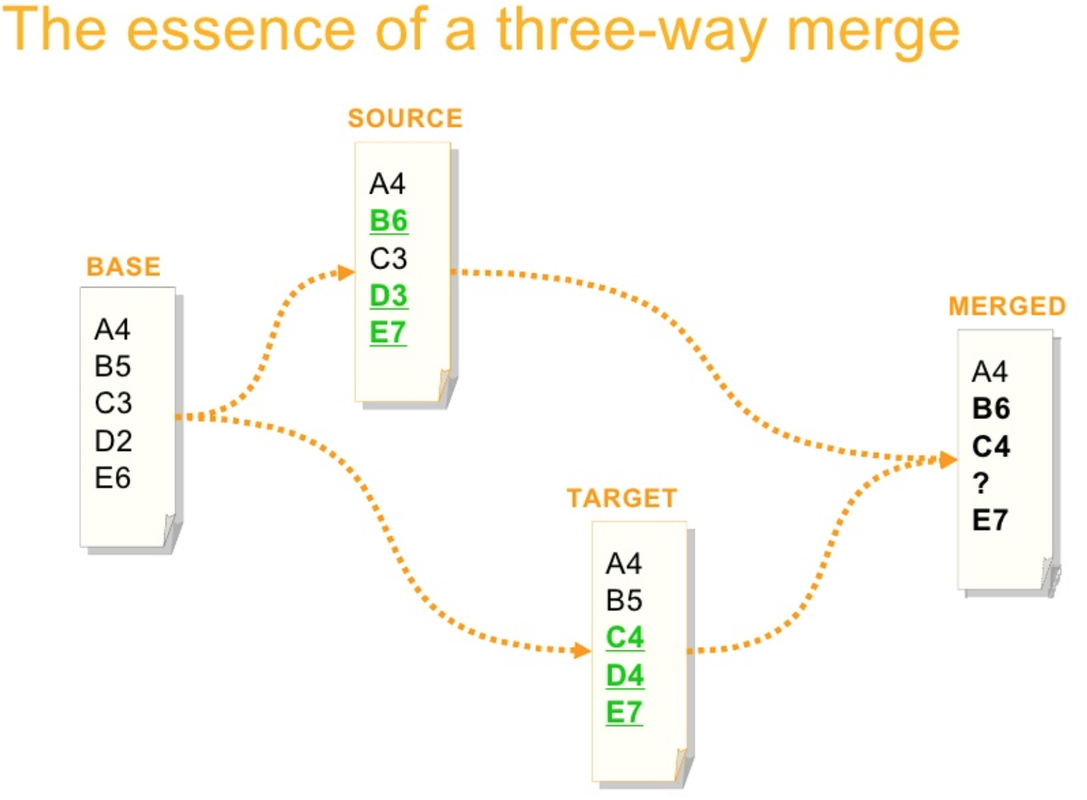
The final merge automatically takes in changes when they don’t conflict, but require manual resolution when they do. However, if there are no conflicts, the merge will easily and quickly go through, forming something like the below image. After that, you may simply delete the old branch if you want to ($ git branch -d iss53), and you’re all good to go!
A lesser-known — but just as useful — tool in git is called rebasing. Say you’re working on a long-term addition when someone on your team issues a hotfix, updating the master branch. You could do a three-way merge, but the other option is to re-base (it makes a lot of sense when you split it into two words!) your feature onto the new master commit.

This can save the time of manually resolving conflicts in a three-way merge, especially if you know that the other changes are here to stay. A git pull will also not work, because it will mess up the merge history. Rebasing is the solution.
Remotes and GitHub
Why GitHub?
Although there are many alternative git web-hosting services, such as Bitbucket and Gitlab, GitHub is by far the most popular, and we recommend it. Aside from having the largest user base and being open-source, the most import reason we choose GitHub is the student pack.
What’s the student pack?
The student pack grants free access to some of the best editors, hosting platforms, all the features of GitHub premium, and much more. To get it, create an account and apply for the student pack.
Git GUI clients
Alright: You’ve now conquered the basic git commands, so what now? Choose a GUI client. This is purely optional though. On balance, git GUI Clients are faster and easier to use for beginners. There are some times when you will need to use git in the command line interface, but you can usually get away with using the GUI Client. We have two favorites at Dev Club:
First, the classic, Github Desktop.
![]()
Pros:
- Made by GitHub and has solid GitHub implementation
- Simple GUI and easy to get started
Cons:
- Can only use GitHub repos
- Not good at complex tasks
- **NO LINUX CLIENT **😢
Second, our favorite, GitKraken.
Note: You can get the pro version of GitKraken with the student pack.
![]()
Pros:
- Feature packed
- Keyboard shortcuts
- Visualize your project
- Built on Electron.js, i.e. native desktop applications, i.e. works on LINUX, Windows, and Mac OS
- Easy and fast to use after practice
Cons:
- Possibly confusing, minor learning curve
Your Turn
Start using GitHub
To start using GitHub you will first need git itself. To download git, head over to their downloads page. Consider what OS you’re using and download the proper version accordingly.
Note: If you’re on the school computers, don’t worry about this; the school computers already have Git installed.
Next headover to [GitHub][https://github.com/] and create an account. While you’re at it, also apply for the GitHub student pack here.
Start by creating a new repository. You first name the repo. That’s all that’s needed to get started. However, you can choose to add additional things to your GitHub repo such as a Description, README, .gitignore, license, and whether you want your project public or private.
What is a README.md?
This is the file that github will add below your project and can be configured to show anything:

What is .gitignore?
A .gitignore file allows you to ignore uploading specific files or folders. To make a .gitignore, create a new .txt file, rename it to .gitignore, and select Type: all. If you are using Mac OS or Linux you can type the following command to add a .gitignore.
cd ~/whatever/directory/your/using
touch .gitignore
From there you can add the locations to the files and folders you want to ignore in the .gitignore file.
What are licenses?
To make a software project open source you need a license. GitHub provides a multitude of licenses that you can add to your project. To figure out what license is right for you, you can use the following site.
Start working on your project
Once you’ve created your project, you will see some code like:
echo "# git-example" >> README.md
git init
git add README.md
git commit -m "first commit"
git remote add origin https://github.com/MBHS-DevClub/git-example.git
git push -u origin master
This uses the HTTPS protocal to setup the repo, but you can also use the SSH protocal if you have a key set up on your device. The last option is to open your project directly in GitHub desktop, or if you use GitHubKraken you can clone your project into a directory of your choosing.
If this is your first time using git, you may be asked to add a username or email to connect your git client with your online repo.
Pull requests
You won’t always have full access to the project you want to edit. In this case, you can use a pull request. To start, go to the desired directory and find the Fork Button:

From there, you should now have a forked repo in your own directory. After editing your own repo, click “New Pull Request” to request a merger of your branch with the original branch:

From there, the owner of the orginal branch can view the changes and choose whether to merge the files. Try this by forking our own repo. Start by creating a pull request to add your own controversial topic.
GitHub issues
GitHub has a rather unique feature for issues. Issues comprise of errors in the owner’s GitHub repo code to general issues with implementing the repo — sort of in a StackOverFlow style. Start by creating a new issue. The text can include markdown; you can add labels, assign people, and much more. This is definitely something with which you should play around by using our repo.

The owner to the repo can reference a given issue using the # symbol or the hash code of the commit. This hash code can be found at the end of a commit’s url. The owner can either manually close an issue or can use the keyword Fix when commiting a change (Fixes #2).
Overall, git and GitHub are things with which you have to experiment to really learn. If you want to work with pull requests and issues, feel free to mess around with our repo.